True Position Calculator - Documentation ↑
Explanations for each field in the form can be found here.
These will help you to make decisions about selecting and entering the correct
values, which will lead to the correct calculation results of the true position.
Position ↑
In Geometric Dimensioning and Tolerancing (GD&T), Position is a fundamental
concept used to control the location and orientation of features on a part. It defines
the allowable deviation from the true position of a feature, such as holes, slots,
or bosses, relative to specified datums.
Position is a locational tolerance that specifies the permissible variation in
the location of a feature's center from its ideal (theoretically exact) position.
It is used to control how much a feature's actual location can deviate from its
true position.
Characteristics:
True Position: The theoretically exact
location of a feature, usually specified by basic dimensions.
Tolerance Zone: A space or zone within
which the center, axis, or surface of the feature must lie.
Datum References: Position tolerances
are almost always applied in reference to one or more datums.
These datums are considered as a datum reference frame or datum system for measurement and control.
Material Modifiers: Position tolerances
often use material modifiers like Maximum Material Requirement (MMR) in ASME/Maximum
Material Condition (MMC) in ISO or Least Material Requirement (LMR) in ASME/Least
Material Condition (LMC) in ISO. These modifiers can affect the tolerance zone
based on the actual size of the feature.
Feature Type ↑
The term feature type in Position refers to the classification of physical
attributes of a part that are controlled by GD&T symbol Position. These feature types
define sizes, locations, and orientations of specific elements on a part. Of course,
other than position, each feature type can have different tolerances applied to it to
ensure proper function and fit in the assembly.
Internal feature ↑
In Geometric Dimensioning and Tolerancing (GD&T), internal features
refer to elements inside a part, such as holes, slots, or internal profiles.
The feature is characterised by one of the key aspects within the GD&T framework:
Feature Size of Internal Feature - Example 1:
Defined by basic dimensions and limits/tolerances. For example,
the width of a groove may be specified as 50 ± 0.01 mm.

Feature Size of Internal Feature - Example 2:
A ø 50 ± 0.01 mm diameter hole would be another example of an internal feature type.

External feature ↑
In Geometric Dimensioning and Tolerancing (GD&T), external features
refer to the outside elements of a part, such as surfaces, edges, and external shapes.
The feature is characterised by one of the key aspects within the GD&T framework:
Feature Size of External Feature - Example 1:
Defined by basic dimensions and limits/tolerances. For example,
the width of a guide rail may be specified as 50 ± 0.01 mm.

Feature Size of External Feature - Example 2:
A ø50 ± 0.01 mm diameter pin would be another example of an external feature type.

Tolerance Zone ↑
In Geometric Dimensioning and Tolerancing (GD&T), a tolerance zone is a defined region
within which the physical features of a part must lie to meet the geometric specifications
on a technical drawing. It establishes permissible limits for variations in a feature's
geometry, ensuring functionality and interoperability in assembled products. The tolerance
zones in the position evaluation can have different shapes, e.g. spherical tolerance zone,
cylindrical tolerance zone, linear tolerance zone.
Spherical Tolerance Zone ↑
A spherical tolerance zone is a three-dimensional zone defined by a sphere in which
the actual feature's center must lie. This zone is used for evaluating the true position
when the tolerance specification is spherical rather than cylindrical or planar.
Spherical Tolerance Zone - Example 1:
The example shows a spherical tolerance zone with a size of Søt mm,
where t is size of the spherical tolerance zone.

Cylindrical Tolerance Zone ↑
In Geometric Dimensioning and Tolerancing (GD&T), a cylindrical tolerance zone is a critical
concept for controlling the true position of features, especially holes, pins, and other
cylindrical objects.
Cylindrical Tolerance Zone in True Position
True Position in GD&T refers
to the exact location or ideal position of a feature relative to a datum or set of datums.
The cylindrical tolerance zone specifies how far the actual feature can deviate from this ideal position.
Comparison with Spherical Tolerance Zone:
A spherical tolerance zone
requires the feature's center to be within a sphere of a specified diameter centered
at the true position, providing isotropic tolerance in all directions.
A cylindrical tolerance zone allows tolerance around the axis
but doesn't constrain the feature in the direction along the length of the cylinder,
making it suitable for features where radial location is critical.
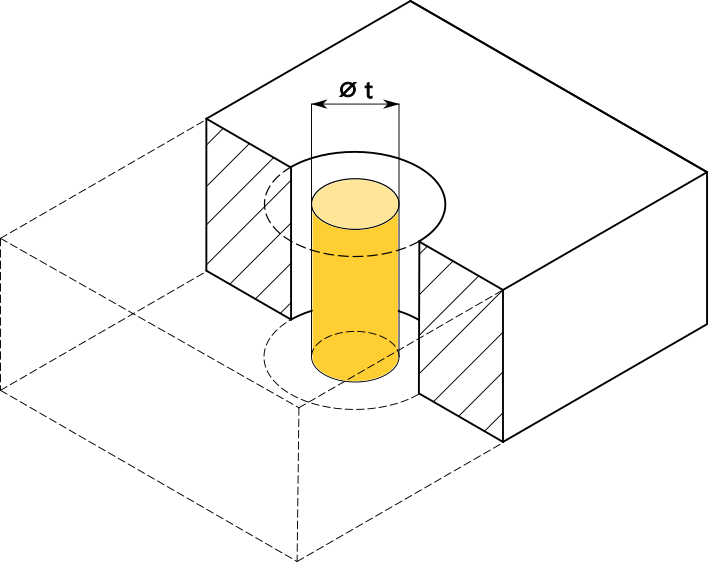
Cylindrical Tolerance Zone - Example 1:
The example shows a cylindrical
tolerance zone with a size of øt mm, where t is size of the spherical tolerance zone.

Linear Tolerance Zone ↑
In Geometric Dimensioning and Tolerancing (GD&T), a linear or planar in 3D tolerance zone is
a 3D region between two parallel planes within which a feature's surface must lie. When this
tolerance zone is oriented parallel to a datum, it ensures that the feature's surface is
controlled relative to the datum plane in terms of position.
Comparison with Other Tolerance Zones:
A spherical tolerance zone provides
uniform tolerance in all directions from a point.
A cylindrical tolerance zone controls radial deviations around an axis.
A planar tolerance zone controls deviations in the direction perpendicular to a datum plane.
Planar Tolerance Zone Parallel to Datum B - Example 1:
The example shows a planar
tolerance zone oriented parallel to the wider side of a part, which could be datum B.
The distance between two planes defining the tolerance zone is t mm, where t is the width
of the planar tolerance zone.

Planar Tolerance Zone Parallel to Datum C - Example 2:
The example shows a planar
tolerance zone oriented parallel to the narrower side of a part, which could be datum C.
The distance between two planes defining the tolerance zone is t mm, where t is the width
of the planar tolerance zone.

True Position Calculator - FAQ ↑
Explanations for each field in the form can be found here.
These will help you to make decisions about selecting and entering the correct
values, which will lead to the correct calculation results of the true position.


